CLICK HERE FOR FREE BLOGGER TEMPLATES, LINK BUTTONS AND MORE! »

Thursday, February 28, 2013

Project Life - Week 5 - January 29 to February 4

 The other day, my Mom asked "do you still make cards or is it just Project Life?" lol. I do love Project Life! 

The answer? 95% Project life and 5% cards! Horrible, right? I hope to soon make the 5% higher!!

So here is week 5! Kalleigh and I went to the library for the first time and Mom and I went to the Scrapbook Expo in Anaheim, CA. I renewed my Disneyland Pass that day too!


This is my favorite card for this page.. The card is from My Mind's Eye "Collectable" line and the paper is called Memorable Journey Journal Paper. It has a bunch of cute journaling cards that are PERFECT for Project Life!

Don't you love those arrows? It's Arrow Washi Tape from Freckled Fawn, you can find it, HERE.


Here's my second page for Week 5! Mom & I went to dinner in Downtown Disney, Joey & I went to the movies, I didn't cheat food wise on Super Bowl Sunday and we went bowling!

I got the "Movie Night" printable on Rukristin Paper Crafts. You can find it, HERE.


One of my absolute favorite thing to do with Photos in Project Life is to print on photos. I know a lot of people use programs like Picasa BEFORE they print their photos. But, I do mine AFTER

HOW-TO print on a photo OR a card!

  • Use your favorite word program to  type your journaling
  • I like to use the ruler on the program to make sure I'm a little bit under 3 inches
  • Print on regular printer paper
  • Place adhesive at the top of the photo (make sure its at the top so your printer doesn't mess up your card!)
  •  Use a light to line up your photo 
  • Run through your printer again (This part can get a little tricky. Make you when you print your paper the first time, that you see how it prints. I have a roller printer, so when I print I face the photo face down and cause there's a roller, it prints and ends up on the top, face up. I hope that made sense! Try it with a scratch paper until you know for sure!)
  • Tare it off the paper. Don't sit there and try to get the adhesive off while you're taking it off the paper
  • That's it!
 This is my favorite card on this page. Not only because the printing on the photo but the story! I'm not sure if you can read it, but when I was getting ready to take a picture of my empty plate, the waiter (who wasn't even our waiter) came and took my plate! lol. I said "wait, wait, wait!" He laughed and set it back down and said he didn't even see I was taking a picture. It was pretty funny!!

Tuesday, February 26, 2013

Project Life - Week 4 - January 22-28

Week 4 is here! Believe it or not, I am caught up to now, just sharing slowly!

This week was a slow week.. Kal wore Papa's shoes around the house, Klayre & I went to the Duck Pond to feed the ducks.. we had a blast! And the girls were coloring on the kitchen floor on a poster board. Good times!


Week 5 is coming up on Thursday!

Friday, February 22, 2013

Happy Valentine's Day Joey!

This is the card I made the boyfriend for Valentine's! Do you see what I did? Or didn't do? I had a total sewing fail! I sewed the 3 sides and then needed to put all the stuff on first so I could sew over the papers on the right.. so my plan was to do that. I put it all on and forgot. 

He wouldn't have even noticed if I hadn't said anything, but by that time I had already posted my #sewingfail on Instagram!!
For this card I used Basic Grey's "Basic Manila" 6x6 stack for the background.

Both of the blue papers are from My Mind's Eye. I made the Polaroid out of Core'dination's "White Wash" paper.

This card is for the February Card Challenge for Sketch. Here's the sketch I made for this month..

 I turned the sketch on it's side for my card.

TO MAKE YOUR OWN POLAROID

I eyeballed the size and used a ruler to make the square on the back. I cut a "X" and cut at the lines!

I then inked the edges and a little bit of the center with a make up sponge, using Vintage Photo Distress Ink. Perfect name, right?

The awesome detail stamp is from Elle's Studio. Go check out (and buy) some of their products if you haven't already! It's a great company and the products are just plain awesome.

The wooden heart veneer is from Studio Calico. I inked it up with some red ink!


Have you ever had an epic fail like this on a project? If so, please share it so I feel better! lol.

Wednesday, February 20, 2013

Project Life - Week 3 - January 15-21

I just can't stop sharing my Project Life!

This is the rest of Week 2 and the beginning of Week 3! Week 2 is rest of CHA, meeting Becky Higgins, Kelly Marie from Lawn Fawn & Heidi Swapp! I journaled about going back and forth for months about deciding whether to do Project Life or not and meeting all these lovely ladies!


This is my favorite card of the page. I absolutely LOVE this Pink Paislee paper! I used part of a grid card and a Soup Label from Jillibean Soup to do the journaling.


On to Week 3! Lots happened this week! I lost 3 lbs., got a new bed, new bedding, got very disappointed about a present that arrived in pieces, Klayre got a front tooth pulled and I got a pegboard!


This is my favorite card from this week! I love the arrows!


Until next time!

Monday, February 18, 2013

Week 2 - Project Life - January 8-14

 Since we're already to Week 8, I figured I would share more of my Project Life!

This is my Week 2!


Here is my favorite card on this page.. and it just so happens that Elle, the designer is right above! In the bottom right corner! I got to meet her at CHA!

This card is from Elle's Studio's "Daily Note Tags". I cut it on an angle and sewed around the bottom so I could make a pocket to hold my old Disneyland Pass and the parking pass for CHA.

The day of CHA, I also got to cross off another item on my bucket list.. seeing Rope Drop at Disneyland. Rope Drop is where they let you in Disneyland before it opens but rope off all the lands and when they open, the drop the ropes! I've been an Annual Pass holder for years and this was my 4th attempt! Better late than never!


This page truly blows my mind! First up is my niece Klayre, you can't see it too well cause of the protector, but she is a Daisy in Girl Scouts and is selling cookies. My sister wrote on chalkboard "How many boxes would you like to buy?" and Klayre wrote her name!

Next up is my badge from CHA.

The next two rows are some of the amazing people I got to meet! There is Teri Anderson, Cath Edvalson, Amy Tan & Susan R. Opel!

I did some journaling on the bottom right!


Here's my favorite card from this page!

I love these wood veneer arrows from Studio Calico!


Saturday, February 16, 2013

Project Life: Week 1 - January 1 - 7

Welcome to my first week of my first Project Life! I am very excited about starting this and I absolutely love it and have been able to keep up with it, which I'll be honest, I wasn't sure I would be able to!

First I'm going to share all my planning details with you! I think without all the planning, it would be a tough thing to not only do but to keep up with!

Planning

 I plan my pages out on Friday night for the previous week and I print my photos on Monday
I bought this cute little folder at the 99 cent store to keep track of everything. They have some super cute binders!


 I use these Project Life Printables that I found on Hello Forever blog, you can find them, HERE.

I traced the outline on the back also, so I would have the backside of the protector on the backside of the paper. Easy peasy!


I have monthly dividers and I have a colored divider so I know which page I'm working on.

  
After I complete a page, I put a small piece of washi tape on the right side so I know it's complete.

 So here it is! My first page of Project Life!

All of my "week" cards will be the same. I'll use the same letter stamps and the same Elle's Studio's "Number It" Stamps, which you can find, HERE.


Printables I used... 
 Every week, I'll also share my favorite card on the page. For week 1, it's this receipt/title card!


 I hope you enjoyed my first week! I can't wait to share more with you!!

Thursday, February 14, 2013

I'm in Paper Crafts Magazine!

I'm always excited to get my Paper Crafts Magazine, but this issue was especially exciting for me!

It's my first time being published in print! If you don't remember, I was one of the World Card Making Day winners for the Birthday category! If you missed my announcement post, you can find it HERE.


There's my card! Page 68.. go check it out, go go go!


Just in case you didn't get a fill of my face from the pictures above, check out page 14 where you can see me and all the rest of the World Card Making Day winners!!


It still didn't seem real but then I was about to throw the envelope away that magazine came in and heard something else in the envelope. It was my card. For some reason.. that made it real. My eyes filled up and I couldn't stop smiling!


Thanks for following my blog and sharing this super fun achievement with me! Happy Valentines!

Wednesday, February 13, 2013

Just add love!

 I made this card for a customer who needed a card for her husband for Valentine's Day!

I bet you're thinking... Valentine's... Circus... what!?

Check out her blog here, Only In The Circus!


 I used Stampin' Up!'s "You're Amazing" collection. I added some Gun Metal stickles on the inside of the Circus letters. I added some scrabble tiles to create the word love so it reads "Love the Circus".


 For this card, I used the sketch I made for the December Card Challenge, which you can find, HERE.

I used My Mind's Eye Love Me collection with their "Pink Hex" paper.


 I used washi tape over a Heidi Swapp ghost letter to create the U.

The cute flag is from Elle's Studio's "True Love Pennants".

I stitched around the edges to finish it off.


Tuesday, February 12, 2013

Cofee, Coffee, Cofee!

 I got two requests for Valentine's Day for cards with coffee! Since I didn't have a coffee type stamps, while we were at the Scrapbook Expo, I bought The Life Of Stamps "Coffee 4 Two" stamp set.

 All the paper on both cards are from My Mind's Eye.

I think it's safe to say that My Mind's Eye is my favorite!


With the coffee cute stamp, I layered all the pieces with pop dots. I don't know if you can tell by the photo though.


 How cute is that doily patterned paper?


I used a couple hears on this cup and attached them with Tim Holtz Tiny Attacher!


Monday, February 11, 2013

February Card Challenge - Theme & Lift

 For the next 4 days until Valentine's Day, I'm going to share some Valentine's Day cards a day with you!

I made this card for the February Card Challenge for the Lift category. We lifted Andrea Ewen's "Be My Valentine" card. You can see her beautiful card, HERE.


Purple and yellow were requested for this card! Can you tell? 

I used Pink Paislee's "Inspire", "Junque" and KI Memories "Holly Jolly".

The cute little note circle is a Chic Tag from Elle's Studio.

The xoxo is also from Elle's Studio's new line called "You & Me", from their Lil' Snippets: Labels.

I embossed a flower and added a rhinestone brad to the middle. I stitched around the edges to finish it off.


 I LOVE THIS CARD!

This is one of my favorites I've ever made.

I used The Sweet Stop's Sketch #196 for this card.

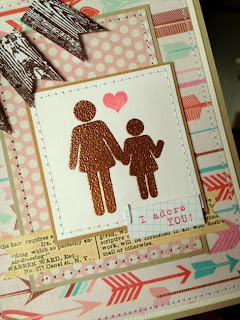
Do you love that arrow paper as much as I do? It's from My Mind's Eye Lucky In Love collections and it's called "Cupid's Arrow".

The pink polka dot paper is from My Mind's Eye's "The Sweetest Thing" 6x6 pad.


 These people stamps are from Autumn Leaves and it's called "Family". There's even a dog in the set! I embossed it with copper embossing powder. I overlapped their hands so it looks like their holding hands.

The I adore you is also from Elle's Studios You & Me collections from their Lil' Snippets: Labels.


These awesome wood grain Pennants are from My Mind's Eye collection, "Miss Caroline" and their called  Howdy Doody Baby Stamps. It's a super cute stamp set, check it out, HERE. I sewed it together to make a little banner and used pop dots underneath to give it some dimension.

I as always stitched around the edges!


Sunday, February 10, 2013

Scrapbook Expo goodies!

Last Friday, my Mom and I went to the Scrapbook Expo in Anaheim, California. If you don't know, a Scrapbook Expo is where local stores sell last years merchandise for super cheap! It's awesome! Check out if there's one close to you.. it's well worth the drive too! Check HERE.


So, I had the plan of not getting too much paper. I wanted to get embellishments. You can see below how well that worked out! It's hard when paper that's usually $1.25 is .25 each or 6 for $1. How do you just walk by? That's right, you don't.

I think like 57 of them are My Mind's Eye too! One of my favorites!


A couple sticker sheets!

 
 Guess how much I paid for this Paper Pack, Chipboard and embellishments? $5!! The paper pack alone is $5.99! All together I saved over $7.00! Score!!


 Some fun new stamps! This is my first stamp set from The Stamps of Life.. very excited about these!

How cute are those people?!


 As I've said I love me some My Mind's Eye! I got these for $2 each! They're $5.99 each!


 I love these stickers from Jillibean Soup! The one in the middle .. the "Keep Calm and Ask Mom" is my favorite.

How cute are the little pin flags from Bella Blvd?!


 This card measures 3x4 and I want to make some for my project life. I will be taking it apart to see how it's made!


 I don't use a lot of ribbon on my projects anymore for some reason, so I tried to limit how much I got. All of this was $3.50! I was thinking I could use Smooch Spritz on the ribbon on the top and turn it any color I'd like!


 Come join us!


 Have you heard of Peachy Cheap? It's a deal a day site for crafty goodness! That's where I got these 4 packages of buttons for $8! They go for over $5 each!

Check out these Deal a Day sites!