CLICK HERE FOR FREE BLOGGER TEMPLATES, LINK BUTTONS AND MORE! »

Sunday, November 14, 2010

'Tis the Season - Easel Card

This is a 3 in one card... 3 challenges in one!

The first one is the November Card Challenge on scrapbook.com that I host. It's for technique, which was to make an easel card. I got the step-by-step instructions on Splitcoaststampers.com.

The second is Clean & Simple #116. Great sketch, right??

The third is Just Add Ink #43, to just add Christmas to your card.

These gorgeous ornaments are from K & Company's Christmas Cheer Collection.

I was going to use a top note die for the front of the card, but it was too small.. so I searched around my room and I was thinking of using K & Co.'s top note chipboard, but it's more like a tag, since there's already a hole in it. So I just traced the acetate front page of the chipboard and cut it out.. it worked wonderfully!

I got the cute little glittery letters, by Making Memories, from Big Lots!

I added a vintage button and some bakers twine in a bow.

Here's the inside of the card..

Saturday, November 13, 2010

Not just for kids & a card!

I recently got 76 pictures printed, for $7!! Not too shabby. I got them printed at Walgreen's, they had a coupon for 50% off and in my opinion, Walgreen's prints the best quality. They're so clean and crisp, I don't go any where else now!!


Journaling: Klayre & Mommy
When you were itty bitty, you couldn't get enough of your play mat! It had colorful animals, a mirror & music too! You spent lots of time on it.. (sleeping too!) Fun for 5 mo. - 26 years

On the Jenni Bowlin Bingo Card, I used a real Bingo Dauber in the shape of heart.

Last week I went to a craft show and there was a Stampin' Up! demonstator there, selling some of her stamps. I got a couple, most that I'm saving for Christmas, but this Merry & Bright I thought I probably shouldn't save it!! lol.

I played along with Mojo Monday #164. Have I mentioned I loved there sketches recently? Oh yeah.. the last time I played along. =]

I used all K & Company paper on this card. Everything but the little tag is the Christmas Cheer Collection.

Thursday, November 11, 2010

Goldilocks and the 3 Bears

It seems I forgot to add a title! I guess it doesn't need one since I didn't even notice it didn't have one until I uploaded it!!

The photo is of my Grandma and Klayre one day at the duck pond feeding the duckies.

Klayre and I went yesterday and we had to get up from sitting on the grass cause literally all the duckies were surrounding us, lol. Then the geese came.. and they're mean, so we threw the rest of the bread and ran to the car. I guess the geese thought it was an invitation to come home with us cause about 5 followed us to the car!! A guy stopped his car next to mine and said "If you just open the backseat, they'll get right in". Silly geese!


Journaling: Great Ga started telling you Goldilocks and the 3 Bears in Las Vegas. You were very excited and listened very carefully to every word. Every time you go to sleep now, you ask to hear it. Since you always listen so carefully, you have a lot of questions each time you hear the story.

Story: "Goldilocks got lost in the woods"
Klayre: "Why did she get lost?"
Answer: "Because her Mommy told her not to go too far (what Mommy tells you), and she didn't listen, so she got lost"
Killed 2 birds with that one!

Story: "She knocked on the door"
Klayre: "Why didn't she just ring the door bell?"
Answer: "They didn't have one"
Klayre: "Does Goldilocks?"

Story: "The 3 Bears weren't home"
Klayre: "Were they picking blueberries on a tractor?"

Story: The 3 Bears were out for a walk in the woods"
Klayre: "Why didn't they just take their car?"

Story: "She went into the living room"
Klayre: "Did she watch TV?"

Story: "She broke baby bears chair"
Klayre: "Why didn't she just sleep on the couch?"

Gotta love her, lol.

For the 3 Bears, I got the idea from the blog Chic' n Scratch. She has a bunch of different animals that you can make out of regular punches.. how fun is that? I made them different sizes and used different papers for their faces.

I wanted to make picture frames like this may be what you see on the wall of the 3 Bears House.

On the paper behind the frames, I printed the 3 Bears story in a little daker ink than the paper and added some distress ink as well.

I gave Mama Bear a little pink bow.


I gave Papa Bear a bow tie.


I had a little bottle for baby bear but forgot to put it on! I'm forgetting everything on this layout!!


I got these little frames YEARS ago at Joanns. I thought they'd be the perfect little touch since the bears were in frames too!

Wednesday, November 10, 2010

HAPPY BIRTHDAY Klayre A Bell!!

3 years ago today, I met Klayre for the first time.. as did everyone else, lol. This was our first picture together! That was the day she stole my heart and wrapped me around her little finger!!


3 years later... this is us a couple days ago making "herbies" in the kitchen. She uses our Mortar & Pestle, a mini whisk and the little tabs off of bread bags to make herbies. We're girls with curls.. don't worry, that will be a title on a layout soon!!


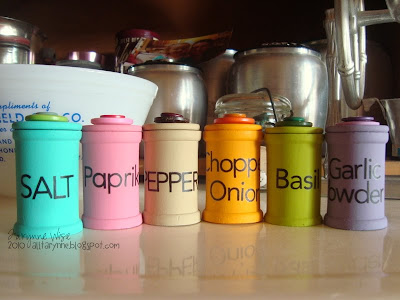
About a year or so ago I found a blog called Nap Time Journal. One of her entrys last March was to a Play Spice Containers for kids. I knew I'd be making them sooner or later! And the time has come!! She has a little retro kitchen that is Red/Black/Silver, so they're not exactly going to match, but she's not going to care!

So, I made her 6 containers of herbies! I made Salt, Paprika, Pepper, Chopped Onion, Basil and Garlic Powder. I used Making Memories Rub-Ons for the words. I made Salt and Pepper in caps because I was going to run out of a's. It turns out I ran out of a's anyway, so for Paprika, I had to cut 2 d's to make a's... shh, don't tell!!


I always like to tie in learning with fun with her, so I put numbers 1-6 on the back.


On the top is a wooden disc and 2 matching buttons. My Mom sealed it with matte clear spray paint today, so the Rub-Ons aren't going anywhere!


Of course there was going to be a card! I used a sketch that I made for the November Card Challenge. You can see it here. Feel free to use it for inspiration but please give credit where it's due, thanks!


I wanted to distress the edges of the purple paper, but since it was a girly card, I didn't want it to look too rough. Another reason why I didn't is because the paper I used is fabric paper. I couldn't even cut it with my paper trimmer. So I went with cutting little slits on the edge, kind of reminded me of gils!

For her Pre-School today, I made cupcakes for all her little friends. I used the cricut to cut out a 3 and used it as a template. I used powdered sugar for the 3 and rolled the edges in little candy sprinkles. We put them in little baggies cause we figured if we gave them to the kids at snack time, they would have never ate their healthy snack!

There was a little problem though... with putting them in the baggies, the oils from frosting sucked the powdered sugar right up and it dissolved! Oh well, what can ya do!! I'm glad I got this photo right after they were done.

These are the little tags I made. Don't you LOVE that font?? Cause I sure do! It's from fonts101.com and it's called Kayleigh.

Monday, November 1, 2010

Winter Wishes

This card was also made for the Caring Hearts Card Drive. You can learn more about it in the side bar to the right. I used the colors from Color Throwdown #116. For the first time I'm playing along with Pals Paper Art, a sketch challenge this week.


I added stickles, glossy accents and crackle acents to the snowman.

3 challenges in 1 post! and some great news!

I made this card for my niece for Halloween. She told me this little guy was her favorite when I bought K&Company's "Spooktacular" Sticker pack. Can't say it surprises me, lol... let's face it, the kids a tad on the goofy side!!

This is for the 50 sketches in 50 days Challenge, day 6/50.


I knew I wanted to use a scallop circle, but didn't want to use paper. So I made a mask using a scallops circle punch and inked it orange and just around the outside I put a little distress ink in Tea Dye.

The last couple days I've been saying this to her... but she refuses to say it, lol.


I made this one for the Caring Hearts Card Drive, which you can find out more about on the right side of my blog.

I used sketch #80 at The Sweet Shop. Have I mentioned I loved their sketches?!

I've lost 30.5 in the last 3 1/2 months!! woohoo! Still have a ways to go though, but I'm just as excited today as I was on the first day I started Medifast. If anyone has any questions about it, please feel free to ask me. If you're looking to lose 10+ lbs. and want to do it a healthy way, you have to try this. Medifast was thought up by doctors and each meal (of the food you buy from them) has the same nutrional value.. so if you want chicken noodle soup for breakfast, you can have that, lol. It's by far the easiest diet ever, there's no thinking about it. You eat 6 meals a day, 5 packaged meals from Medifast like soups, bars (in all honestly, I'd rather have a Peanut Butter Crunch Bar rather than a Reeses.....), shakes, pretzels, pancakes, soft serve and tons more. Then you have one "real food" meal, which is called your lean and green. There's a book that tells you how much you can have and everything. And this diet food doesn't taste like diet food... it's actually really really tasty. So anyway! Here's my before and 1/2 way through pictures. I have another before picture that I took in clothes that I knew didn't fit, but I don't think I want that picture floating around the internet, lol.

Between my Mom, my Sister, my Brother In Law and myself, we've lost over 140lbs!!! Holy canoli!!

If anyone is seriously interested in going on Medifast, or learning more about it, feel free to e-mail Branden or Tifnee (the sister and the bro in law) at Leonlifestyle@gmail.com and tell them I sent ya!!

If that wasn't enough good news... I have more! I seem to have won the ScrapFIT challenge #30! Remember the "Happy Boo to you" candy container I made for my niece for Halloween? That's what I entered! Soooo very excited!! I've never won anything on a blog challenge!!

Ok, deep breath =]

Friday, October 29, 2010

1st day of Pre-School

I lifted Pallavi01's "The SF Chill" on scrapbook.com. It's for the Scrapbook the person before you challenge.

I decided to scrap Klayre's 1st day of Pre-School photos. We didn't have time to take picture before school, so we took them after. She wouldn't stay still or look at the camera, so that's always fun.... =] The picture on the left was her running from me taking pictures, I really like how it came out!!

Don't you just LOVE that elements paper? It's called Elemental and it's by Reminisce.


Journaling: Klayre was 2 3/4 years old when she started (name of Pre-School) Pre-School. She started on September 14th, 2010. She goes 2 days a week from 9:00am - 12:00pm. Ga & TT take her to school and pick her up from school. She has a green M&M backpack that Great Ga bought her in Las Vegas. She gets lots of compliments on it!

I wanted a type writer type font to match the Bo Bunny printed paper. Granted, it doesn't at all match, lol, but I think it still goes with the whole school theme! I found "Traveling_Typerwriter" on fonts101.com. It's a site that you can download free fonts, and cute ones at that!


Monday, October 25, 2010

Season's Greetings

I came across Ling's Design Studio and saw Caring Hearts Card Drive. They're collecting cards to give to the elderly in nursing homes and assisted living/care centers. Make sure to check it out!!

If that isn't enough to get you to want to make some cards, there's prizes too!

I'd love to have a great story about how I got the inspiration for this card.. but this is how it happened... I was sitting at my desk, scratching my noggin and was facing where I keep my eyelets, thinking about making a Christmas Card. Staring at my eyelet container for a minute I thought why now make a Christmas tree out of eyelets?

And now you know my thought process...lol, are you scared now?

I was going to distress the edges of the kraft cardstock, but only remembered AFTER I adhered it.


I'd love to make more, but I don't have many green eyelets left!

To make the tree: You could always freehand, but since I can't, I used a ruler instead! Say your cardstock is 3 inches wide.. using a ruler, make a dot where 1 1/2 is, then move the ruler down a bit, making sure to leave enough room for the eyelets. Then mark a dot at 1 and 2 and so on down the tree. And don't forget to leave room for the trunk!


Don't you love that button?? I sure do!

Sunday, October 24, 2010

Halloween Cards

I made 20 of these cards (with different characters on the front) for my neighbors school. They're collecting cards to give to children in the hospital who won't be with us much longer. All I can hope is that these cards bring lots of smiles!

The insides say : Hope your Halloween is as sweet as you are!

For some reason I can't get enough of this cat! I think it may be because it reminds me of our cat that passed a few years ago, who was perfectly named, PUNKIN! Her picture is below.

Don't let that sweet face fool you... she was one crazy kitty!!

Wednesday, October 20, 2010

Coffee Sleve Mini Album

Last year my Dad was at a job and they we're throwing away a box of Coffee Sleeves. There has to be at least 500 in this box, so he brought it home for me, lol. Wouldn't every Dad do that??

So, when I saw Ms. Missy's Coffee Sleve Mini Album Swap on scrapbook.com, I wanted to be a part of it!!

I've made a mini album before, but never with Coffee Sleeves. Or Java Jackets as mine say on the back!!

The Front - pretty simple front. The GIRL were red, green and white wood letters.

Pleaded paper and journaling spots on both side.

See the glittery green tab? It pulls out for more journaling/for pictures.


I guess I didn't take a picture of this one together, sorry!


I knew I wanted to use this quote some where!


On the left is a little pocket with a tag for journaling. The yellow glittery tag pulls out to put more journaling/photos.


These are my favorite! This was actually the 1st page I did.

I made the branch with Core'dinations, brown cardstock that has a tan inside. I twisted the paper and used glue dots to adhere it and then I sanded it.

The pink tab pulls up for more journaling/photos.


This one also has a little pocket that holds a journaling tag.


Halloween Goodies

A couple weeks ago my Mom gave me 2 of these clear containers.. I had no clue what I was going to do with them, but I knew I had to do something!! I decided to make this little treat for Klayre for Halloween.

I'm entering this in "The Sweet Challenge" at The Paper Variety.

It's also for the "Color Me Happy" at ScrapFIT. You had to use lime green, orange, purple and black. Check, check, check, check!


I'm loving this flower! I punched out 4 scallop circles with my 1 1/2 punch. I cut 3 of them in half, using the whole one as a base. After cutting them in half, I used 3 to make one cicle, overlaping on side. I taped them with scotch tape, just in the center, so they'd stay while I positioned them. I used pop dots between each layer.. I think it would be cute being distressed on the stright edges too!

I figured since Halloween is coming up, I better get the baby's 1st and 2nd Halloween layouts done!!

I used Sketch 125 at Creative Scrappers for this layout.. then took too long making it, so I couldn't enter it in the challenge.. oops! I'll learn one of these days!!

This is the munchkins 1st Halloween. Look at those chubby little legs and her rubberband wrists!


I've used these pumpkins before, I cut them out of a Heidi Grace Paper and used Glossy Accents on the eyes and teeth.

This is her 2nd Halloween as the cutest little lion ever!


Journaling: You really enjoyed stealing candy from Ga & Papas house! At times we couldn't tell if you had your mane on or not! Halloween Oct. 09

These Chipboard letters started out pastel.

R - It was as is, I just distressed the edges.
O - I added orange glitter and put Glossy Accents on top of it and distresses a couple spots around the edge.


A - I used Heidi Swapp's paint that dries glossy.
R - I painted it orange, distressed the edges and put white glitter polka dots on it.

I tied them together with black twine.